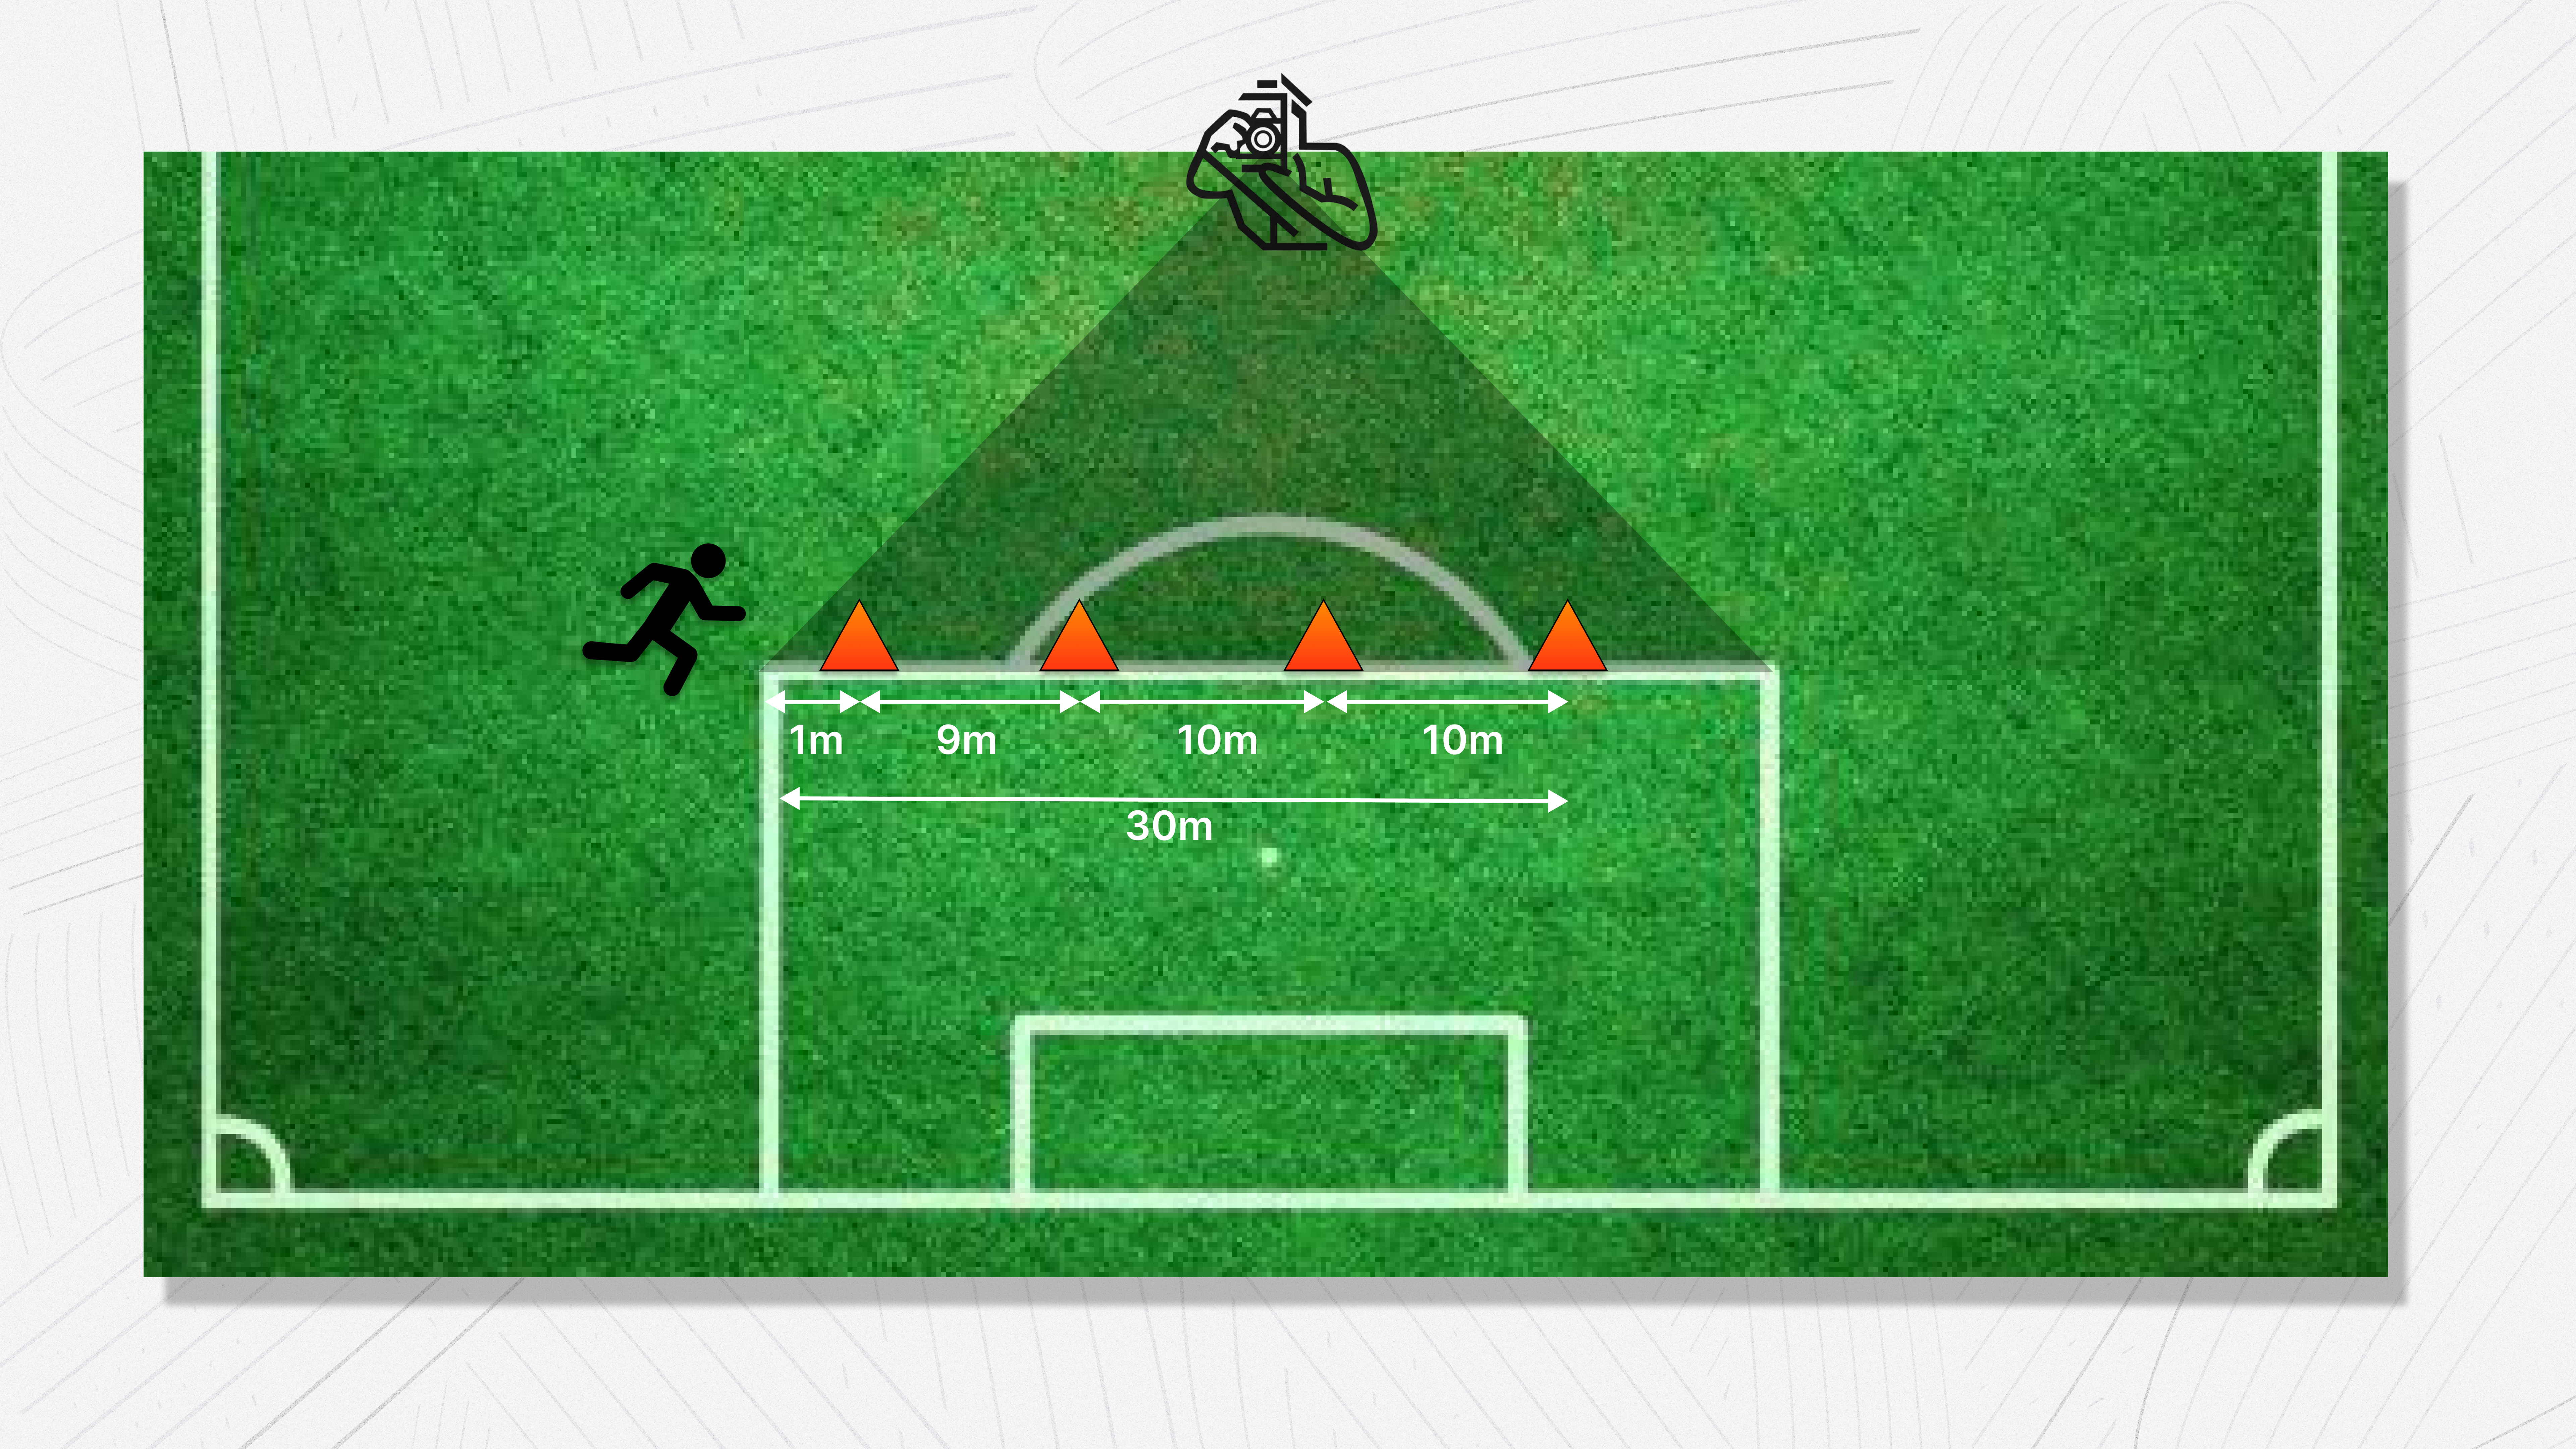
Performance Testing Guide

A practical guide for grassroots football coaches

Physical performance matters at every level of football. Performance tests give you concrete numbers that turn vague impressions into clear insights — helping you shape training sessions, track real progress, spot individual needs, and keep players motivated. What gets measured gets improved.

Record your results

Fill in the test data and download your results. Share your results with Mingle to receive the benchmarks.

📝

Enter session results

Record test data, see live rankings, and export results

What's in this guide

Five field-tested performance tests you can run with basic equipment and a mobile phone.

Mingle Official Test

30m Sprint

Acceleration & top speed

±10 min
Mingle Official Test 🔀

Illinois Agility Test

Agility & change of direction

±15 min
Mingle Official Test 🪫

Yo-Yo Intermittent Recovery Test

Football-specific endurance

±25 min

Illinois Agility Test (with Ball)

Dribbling speed & ball control

±15 min
🦘

Vertical Jump

Explosive power & jump height

±10 min

More resources

📋

Organizing your session

Plan, prepare, and run a smooth test day

📈

Understanding benchmarks

How to read and use your players' scores

Mingle Official Test

30m Sprint

Acceleration & top speed · ±10 minutes

Benchmark data available This is a Mingle Official Test. Results can be compared to age- and gender-based benchmarks when using the Mingle Input Form.

Why this test?

Football is a game of short, explosive moments. A striker breaking through the defensive line, a fullback recovering to stop a counter-attack, a winger sprinting to reach a through ball — these moments are decided by pure speed.

The 30m Sprint test measures two things: acceleration (how quickly a player reaches top speed, measured over the first 10 meters) and top speed (their maximum sprinting ability, measured between 20 and 30 meters). These are distinct physical qualities — a player can be quick off the mark but not particularly fast at full speed, or vice versa. Knowing the difference matters for coaching.

A player with strong acceleration but lower top speed thrives in tight spaces — think central midfield, playing short passes and making quick runs. A player with high top speed but slower acceleration might be better suited to wide positions where they have room to build up pace. Understanding your players' sprint profiles helps you make smarter decisions about positioning, playing style, and what to work on in training.

What you need

Setup

Set up the sprint along the long line of the 16m area. Place 4 cones in a straight line at the following distances:

The player starts behind the 16m area line.

30m Sprint setup diagram showing 4 cones placed at 1m, 10m, 20m, and 30m along the 16-meter area line, with camera position at a 90-degree angle
30m Sprint — field setup with cone positions and camera angle

Execution

  1. Line up players alphabetically.
  2. Each player sprints at maximum speed through the full 30m. Important: players should not slow down at the last cone — they sprint through it.
  3. Each player gets 3 attempts.
  4. Film each attempt on video. One video per attempt.

Video recording requirements

Phone settings

iPhone

Before the session, adjust these settings:

  1. Camera format: Settings → Camera → Formats → select "Most Compatible". This records in H.264 MOV format, which is easier to process.
  2. Recording quality: Settings → Camera → Record Video → select "1080p at 60fps".
  3. Transfer settings: Settings → Photos → Transfer to Mac or PC → select "Keep Originals". This prevents the phone from converting the video during transfer.

Android

  1. Open your camera app → Video settings → set resolution to 1080p and frame rate to 60fps.
  2. No additional settings needed for transfer.

Transferring videos to your computer

Important Always transfer videos via USB cable. Do not use AirDrop, cloud storage, or email — these can compress the video and reduce the frame rate.

iPhone

  1. Connect your iPhone to your computer with a USB cable.
  2. Mac: Use Image Capture or Finder to copy the video files.
  3. Windows: Use File Explorer to browse the phone and copy the video files.

Android

  1. Connect your phone with a USB cable.
  2. Select "File Transfer" (MTP) mode when prompted.
  3. Copy the video files directly from the phone's DCIM folder.

Verification: After transfer, right-click the video file → Properties (Windows) or Get Info (Mac) and confirm the frame rate is 60fps.

Processing the videos (Mac — QuickTime Player)

This is how you extract the sprint times from the video:

  1. Open the video in QuickTime Player.
  2. Enter trim mode: press Cmd+T (or go to Edit → Trim).
  3. Use the left and right arrow keys to step through the video frame by frame.
  4. For each cone, find the frame where the player's hips align with the cone. Read the timestamp displayed in the format 00:01.23 (seconds.centiseconds).
  5. Note the timestamp at each of the 4 cones. You'll have 4 values per attempt.
  6. Enter the timestamps into the Google Sheet / Mingle input form.
  7. The sheet automatically calculates acceleration (0-10m time) and top speed (20-30m time) from the differences.
Why timestamps instead of frame counting? Timestamps are frame-rate-independent. Whether someone accidentally recorded at 30fps or correctly at 60fps, the timestamps are still accurate — the only difference is precision (30fps gives ~33ms steps vs 60fps gives ~17ms steps). 60fps is still recommended for better precision, but the calculation works correctly either way.
Mingle Official Test 🔀

Illinois Agility Test

Agility & change of direction · ±15 minutes

Benchmark data available This is a Mingle Official Test. Results can be compared to age- and gender-based benchmarks when using the Mingle Input Form.

Why this test?

Football isn't played in straight lines. Players constantly change direction — sidestepping an opponent, adjusting to a loose ball, turning to track a run. Agility — the ability to change direction quickly without losing speed or balance — is one of the most important physical qualities in football.

The Illinois Agility Test measures exactly this. Players sprint, turn, and weave through cones in a course that mimics the kind of multi-directional movement football demands. The result is a single time that captures how efficiently a player moves through changes of direction.

This is especially relevant for defenders who need to react and turn quickly, midfielders navigating crowded spaces, and any player involved in 1v1 situations. If a player's agility score is significantly behind their sprint speed, it tells you they're fast in a straight line but lose time when they have to change direction — something you can specifically target in training with cone drills, ladder work, and small-sided games.

What you need

Setup

The course is a 10m × 5m rectangle.

Illinois Agility Test setup diagram showing a 10m by 5m rectangle with 4 corner cones and 4 center cones spaced 3.3m apart, with the weaving route marked
Illinois Agility Test — course layout with cone positions and running route

Execution

  1. The player starts in a lying position at the start line, hands by their shoulders.
  2. On the signal, the player gets up and sprints to the first center cone.
  3. The player weaves zigzag through the 4 center cones.
  4. At the end, the player sprints back to the finish line.
  5. Record the time with a stopwatch.
  6. Each player gets 2 attempts.
  7. Enter the times into the Mingle input form.

Illinois Agility Test (with Ball)

Dribbling speed & ball control under pressure · ±15 minutes

Why this test?

Running fast through cones is one thing — doing it with a ball at your feet is something else entirely. The Illinois Agility Test with Ball takes the standard agility course and adds a football, turning it into a measure of technical control under physical pressure. The skill isn't just dribbling — it's dribbling while changing direction at speed, keeping the ball close through sharp turns, and maintaining composure when your body is working hard.

The real value comes from comparing a player's time with the ball to their time without it. The gap between the two tells you how much speed a player loses when they have to control a ball. A small gap means the player can move almost as freely with the ball as without it — a sign of strong technical ability. A large gap reveals that ball control breaks down under pressure, even if the player looks comfortable in low-intensity drills.

This test is especially relevant for wingers, attacking midfielders, and dribblers — players who need to beat opponents in tight spaces while maintaining speed. The good news: the gap between with-ball and without-ball agility is highly trainable. Targeted dribbling drills through cones, small-sided games with tight spaces, and 1v1 exercises can all narrow that difference over time.

What you need

Setup

The course is identical to the regular Illinois Agility Test — a 10m × 5m rectangle.

Illinois Agility Test setup diagram showing a 10m by 5m rectangle with 4 corner cones and 4 center cones spaced 3.3m apart, with the weaving route marked
Illinois Agility Test (with Ball) — same course layout as the standard Illinois test

Execution

  1. The player starts in a lying position at the start line, hands by their shoulders, with the ball placed directly in front of them.
  2. On the signal, the player gets up and dribbles the football to the first center cone.
  3. The player weaves zigzag through the 4 center cones while keeping the ball under close control.
  4. At the end, the player dribbles back to the finish line.
  5. The ball must stay within playing distance at all times. If the ball runs too far away from the player (more than ~2 meters), the attempt is invalid.
  6. Record the time with a stopwatch.
  7. Each player gets 2 attempts.
  8. Enter the times into the Mingle input form.
Recommendation: always test alongside the regular Illinois test The real insight from this test comes from the comparison. Run the standard Illinois Agility Test (without ball) and this variant in the same session. The difference in time reveals how much speed a player loses when controlling the ball — a metric that's far more meaningful than either time alone. This “agility gap” gives you a clear, trainable target for technical development.
Mingle Official Test 🪫

Yo-Yo Intermittent Recovery Test

Football-specific endurance · ±25 minutes

Benchmark data available This is a Mingle Official Test. Results can be compared to age- and gender-based benchmarks when using the Mingle Input Form.

Why this test?

Football is not a long-distance run. During a match, players alternate between sprinting, jogging, walking, and standing still — over and over again for 90 minutes. What separates a player who stays sharp in the 85th minute from one who fades after halftime isn't steady-state endurance. It's intermittent endurance: the ability to recover quickly between repeated high-intensity efforts.

This is exactly what the Yo-Yo Intermittent Recovery Test measures. Unlike a continuous running test (like the beep test or a Cooper test), the Yo-Yo test includes a short recovery period between every shuttle — mimicking the stop-start nature of a real football match. That makes it the most football-specific stamina test available.

The results tell you how well a player can sustain repeated high-intensity efforts with limited recovery. A player who scores well can press the opponent, make overlapping runs, and still recover in time for the next sprint. A player who scores poorly will start making slower decisions, lose duels, and become a passenger in the final third of the match. Stamina is trainable — and knowing where your players stand helps you design sessions that build the right kind of fitness for football, not just general cardio.

What you need

Setup

You need a large free space — minimum 25m deep.

For each player, place 3 cones in a line:

Use the sideline and middle line of the field as reference points to keep the rows straight. Make sure all players can hear the speaker — a portable bluetooth speaker is essential.

Yo-Yo Intermittent Recovery Test setup diagram showing rows of 3 cones per player with 5m recovery zone and 20m shuttle distance
Yo-Yo IR Test — cone layout with 5m recovery zone and 20m shuttle distance

Execution

  1. All players start at the middle cone (0m).
  2. On the beep, players run to the far cone (20m) and back to the middle.
  3. A warning beep sounds at the halfway point (when players should be at the far cone).
  4. Players must return to the middle cone before the next loud beep.
  5. After each shuttle, players walk to the recovery cone (5m) and back. This is the active recovery period.
  6. The test continues with increasing speed.
  7. If a player fails to make it back in time, they receive a warning. The second time they fail, they are out.
  8. Record the last successfully completed level for each player in the Mingle input form.
🦘

Vertical Jump

Explosive power & jump height · ±10 minutes

Why this test?

Explosive leg power is one of the most decisive physical qualities in football. A center back rising above the attacker to clear a corner, a striker getting ahead of a defender to meet a cross, a goalkeeper stretching to tip a shot over the bar — these moments are won or lost by centimeters, and those centimeters come from how much force a player can generate in a fraction of a second.

The vertical jump is one of the purest measures of lower body explosive power. Unlike a sprint, which involves technique, stride mechanics, and pacing, a vertical jump strips everything back to a single movement: how high can you launch yourself off the ground? The result is a direct reflection of fast-twitch muscle recruitment and the rate at which a player can produce force.

A player who jumps higher doesn't just win more headers. The same explosive qualities that drive jump height also correlate strongly with acceleration and sprint power. The fast-twitch muscle fibres that propel a player upward are the same ones that drive powerful first steps, sharp changes of direction, and explosive movements off the mark. Vertical jump ability is a window into a player's overall explosiveness — on the ground as much as in the air.

Aerial duels are decisive in both attacking and defending set pieces. A team that consistently loses headers from corners, free kicks, and goal kicks is giving away goals and creating fewer chances. This test is especially relevant for center backs, strikers, and goalkeepers, but every position benefits from explosive lower body power — from fullbacks powering forward on overlapping runs to midfielders winning 50/50 challenges.

What you need

No other equipment needed.

Setup

Find a line on the pitch for the player to stand on — this makes it easier to judge the jump in the video. The phone films the player from the front, with the full body visible in frame.

Filming requirements

This test requires slow-motion video at 240fps. This is critical — 60fps is nowhere near accurate enough for measuring jump height from airborne time.

iPhone settings

  1. Slow-motion quality: Settings → Camera → Record Slo-mo → select 1080p at 240fps.
  2. Camera format: Settings → Camera → Formats → select "Most Compatible".
  3. Transfer settings: Settings → Photos → Transfer to Mac or PC → select "Keep Originals".
Android cannot be used for this test Android phones do not reliably report the actual frame rate a video was captured at, which makes accurate measurement impossible. You must use an iPhone for the Vertical Jump test.

Checking the actual FPS

After recording, the player or coach must check the actual FPS of the video. On iPhone, open the video in Photos and swipe up to see the video details — this shows the real frame rate (e.g. 239.something fps). Note down this exact FPS number — it needs to be entered in the Mingle input form for accurate calculation.

Transferring videos to your computer

Important Always transfer videos via USB cable. Do not use AirDrop, cloud storage, or email — these can compress the video and reduce the frame rate.
  1. Connect your iPhone to your computer with a USB cable.
  2. Mac: Use Image Capture or Finder to copy the video files.
  3. Windows: Use File Explorer to browse the phone and copy the video files.

Execution

  1. The player stands on the line, feet shoulder-width apart, hands placed on the hips. Arms stay on the hips throughout the entire jump — this is a countermovement jump without arms.
  2. The player dips down and immediately jumps as high as possible.
  3. Each player gets 3 attempts.
  4. All 3 attempts are averaged in the input form (this corrects for small measurement errors from frame rate precision).
Valid jump form — important A jump is invalid if any of the following occur:
  • The player falls over after landing
  • The player jumps forward instead of straight up (they should land roughly in the same spot)
  • The player delays their landing in any way (e.g. tucking knees up, landing on their knees instead of their feet)

If a jump is invalid, the attempt must be repeated.

Processing the videos (Mac — QuickTime Player)

  1. Transfer the video to your computer via USB cable.
  2. Open the video in QuickTime Player.
  3. Go to View → Time Display → Frame Number to switch the time display to frame numbers.
  4. Use the left and right arrow keys to step through frame by frame.
  5. Find the last frame where the toes are still on the ground — note the frame number.
  6. Find the first frame where the toes touch back down — note the frame number.
  7. Enter both frame numbers into the Mingle input form, along with the actual FPS from the video details.
How the calculation works The input form uses the frame numbers and actual FPS to calculate the time spent in the air, and from that calculates the jump height automatically.
📋

Organizing your session

Everything you need to plan, prepare, and run a smooth test day

Before the session

1. Choose your format

You have two options for running the tests:

Option A: Full battery in one training session. All 3 tests in ±50-60 minutes. This is the recommended approach — you get all your data in one go and players only need to "show up ready" once.

Option B: Spread tests across multiple trainings. Pick individual tests per session. This works if you're short on time or volunteers, but keep in mind that results are most comparable when players are tested under similar conditions (same warm-up, same fatigue level).

2. Get your volunteers

You need at least 2 people to run the full battery — one per group. Ideally this is the head coach plus an assistant coach or parent volunteer. Their roles:

For the Yo-Yo test, both volunteers work together — one operates the speaker/audio, the other tracks which players drop out and at which level.

3. Prepare player groups

Divide players into 2 groups, arranged alphabetically. This makes it much easier to track results and match video files to the right player later. Share the group lists with your volunteers before the session.

4. Collect player information

Before the session, collect the following from each player: age, gender, and preferred playing position. This information is needed to calculate benchmarks — without it, some results can't be compared to reference values. If a player prefers not to share, that's fine, but their benchmark comparison will be limited.

5. Gather equipment

Here's your full checklist:

6. Prepare the filming phone

The sprint test requires video at 60fps. Before the session, make sure the filming phone is set up correctly:

Check that both phones have enough storage space for video (±1GB should be plenty).

7. Inform the players

Before the session, let players know:

On the day: session flow

Step 1 Warm-up + set up (15 minutes)

While players do their normal warm-up (jogging, dynamic stretching, short sprints), the volunteers set up the two test stations on the field.

Field layout: Use half a football field. Set up the Sprint along the long line of the 16m area — this gives you a straight 30m line with clear markings as reference. Set up the Illinois Agility Test in the center of the half, between the 16m area and the halfway line. Leave the remaining space for the Yo-Yo test.

Field layout diagram showing Sprint along the 16m line, Illinois Agility in the upper corner, and Yo-Yo Stamina test in the remaining space
Recommended field layout — all three test stations on half a pitch
Tip Artificial grass is preferred. These tests — especially the Illinois — can tear up natural grass if the field is soft.
Step 2 Group tests — Round 1 (±15 minutes)

Split into groups and start:

Group 1Group 2
30m Sprint (3 attempts per player)Illinois Agility Test (2 attempts per player)

Each player runs, walks back, and waits for their next turn. Keep the queue moving — alphabetical order helps.

Step 3 Group tests — Round 2 (±15 minutes)

Swap the groups:

Group 1Group 2
Illinois Agility Test (2 attempts)30m Sprint (3 attempts)
Step 4 Short break (5 minutes)

Give players time to catch their breath, drink water, and recover before the stamina test. Use this time to set up the Yo-Yo cones — remember, each player needs their own set of 3 cones.

Step 5 Yo-Yo Intermittent Recovery Test (±25 minutes)

All players do this together. Both volunteers are free now — one manages the speaker/audio, the other tracks results (noting which players drop out and at which level).

Step 6 After the session

Back home or at the club:

  • Sprint videos: Transfer videos to your computer via USB cable (not AirDrop or cloud). Rename files to a clear format: Sprint_Group1_Attempt1, Sprint_Group1_Attempt2, etc. Process the videos using QuickTime Player to extract timestamps. (See the Sprint test chapter for the full workflow.)
  • Illinois times: Verify all stopwatch times are entered correctly in the Mingle input form.
  • Yo-Yo scores: Verify all final levels are recorded in the Mingle input form.
  • Analyze: The Mingle input form calculates your results automatically. Review them, compare to benchmarks, and — most importantly — decide what this means for your next training sessions.
📈

Understanding benchmarks

How to read and use your players' benchmark scores

When your test results are processed — either through the Mingle input form or the Google Sheet — each player's performance is compared to a benchmark. This tells you how they performed relative to other players.

Official tests only Benchmark data is currently available for Mingle Official Tests only: the 30m Sprint, Illinois Agility Test, and Yo-Yo Intermittent Recovery Test.

How it works

Benchmarks are based on percentile scores. A percentile tells you what percentage of players scored equal to or lower than a given result. For example, if a player's sprint acceleration is in the 75th percentile, that means they were faster than 75% of players in their reference group.

Mingle translates percentiles into easy-to-understand categories:

CategoryPercentileWhat it means
Poor≤10thWell below average — priority area for improvement
Fair≤25thBelow average — room for improvement
Below average≤45thSlightly below the midpoint
Average≤55thIn the middle of the pack
Above average≤75thBetter than most players in this group
Good≤90thStrong performance
Excellent>90thExceptional — among the top performers

What are players compared to?

Currently, benchmarks are based on age group and gender. So a 14-year-old boy is compared to other boys in the same age range — not to seniors or adult women. This makes the comparison fair and meaningful.

The benchmark data comes from performance tests conducted with football teams across the Netherlands and is continuously updated as more teams participate. The more teams test, the more accurate and representative the benchmarks become.

In the future, Mingle aims to refine benchmarks further — taking into account playing level, exact age, and playing position for even more precise comparisons.

Entering results in Mingle

Currently, test results are processed outside of the Mingle app using the input form and Google Sheet. However, Mingle is working on making it possible to enter performance test results directly into player profiles within the app — including tests done in the past. This feature is on the roadmap for the upcoming season, and will make it much easier to track player development over time right where you already manage your team.

What to do with the results

The benchmark category isn't a judgment — it's a starting point. Here's how to use it:

📋

Record Test Results

Enter session details, player data, and test measurements

Session info

Club name is required
Team name is required
Playing level is required
Test date is required

Tests performed

30m Sprint
🔀 Illinois Agility Test
🪫 Yo-Yo Intermittent Recovery Test

Please select at least one test

Players

📊

Enter Results

Submit & Export

📎 Don't forget to attach your CSV file before sending. Use the Download CSV button below, then attach the file to the email.
📈

Understanding benchmarks

How to read and use your players' scores